Backend Documenation
Indepth guides for CleverStack's Backend covering installation, configuration, usage and extending.
Indepth guides for CleverStack's Backend covering installation, configuration, usage and extending.
CleverStack has been designed to provide you with a super fast test driven back-end development lifecycle that will make writing even the most (seemingly) complex applications trivial.
Everything you need should be just one command away, if it's not please open an issue or fork the repo on github and submit a pull request.
Our NodeJS Backend takes advantage of an NPM feature called the Node Path, by using the environment variable NODE_PATH we are able to take advantage of require's hidden power - to load folders as if they were an NPM Module.
Using our Magic Module utility, gives you the ability to load things, like this: (in any module/file)
require('utils').bootstrapEnv
require('models').ExampleModel
require('services').ExampleService
require('controllers').ExampleController
You can use this loading syntax in any file inside your project (including files inside of modules), And you can use this utility yourself to create custom folders/modules, by simply doing require('utils').magicModule('folderName').
grunt server or node app)
If you want to run, or are trying to run commands without the CLI (clever command) - Remember to set your NODE_PATH, see setting your node path below.

require any of these anywhere in your application).NODE_PATHIn most cases you will not need to set your NODE_PATH, however if you are running commands without clever, (like node cluster, or nodemon app for example), or see an error like the following image, then you will need to set your NODE_PATH.

export NODE_PATH=./lib/:./modules/set NODE_PATH=./lib/;./modules/
CleverStack has Open Source Modules for things like Authentication, Accounts, Roles (RBAC), Background Tasks (processes), Country & Timezone Databases, Subscriptions (as a service) - as well as many more...
We recommend visiting our Modules page to get the full and upto date list of modules.
Dependency Injection in CleverStack is provided by our clever-injector NPM Package, (that is based on the popular AngularJS), the code is open source and available on Github.
All Modules, Controllers, Services, Models, Tasks, Routes, Tests (and more) are loaded (including all of their dependencies in a recursive manner), and injected automatically using the clever-injector NPM Package.
Simply put the name of the dependency you need in the function exported by the file and it will be loaded and injected for you automatically.
module.exports = function(config) {
  // config is loaded and injected into this function for you
}
Please see the README on Github for more documentation & information about clever-injector.
Cleverstack provides a clear and simple structure that will make writing even the most (seemingly) complex applications trivial.
Complexity kills. It sucks the life out of developers, it makes products difficult to plan, build and test, it introduces security challenges and it causes end-user and administrator frustration.
node-seed/
├── config/           # configuration files
├── lib/              # cleverstack core
├── modules/          # backend modules
├── schema/           # backend schema
│   └── seedData.json # application seed data in JSON format
├── tasks/            # build/dev tasks
│   ├── grunt/        # grunt tasks
│   └── gulp/         # gulp tasks
├── tests/            # global app and cleverstack core tests
│   ├── e2e/          # end to end tests
│   └── unit/         # unit tests
├── Gruntfile.js      # app grunt config & tasks
├── cluster.js        # runs a clustered server with multiple app.js workers
├── app.js            # runs a single node http server
└── package.json # npm dependencies and package informationThis is where the Cleverstack Core is kept, we recommended not modifying anything in this this folder unless you know what you are doing.
Certain folders are magic modules and can be required in like require('models'), this is made possible by the use of the NODE_PATH variable.
If you modify files in this folder, then it is highly likely things may not work if you do not know what you are doing. It is also important to remember that making changes in here makes it hard to upgrade or downgrade your backend without loosing your changes.
This is where all of the Cleverstack modules will be installed into your application.
You also add custom modules inside this folder, either by creating it manually or using the CleverStack CLI's install, generate or scaffold commands.
You can place any NPM module inside this directory, however to take advantage of the true power & flexibility of CleverStack you will need to add and change some key (but easy) points.
Example See the Backend Example Module for an example of how to create a cleverstack enhanced module.
This is where all your application/project wide/specific seed data should go, stored in the schema/seedData.json.
Also the default location for any sql scripts/dumps/triggers etc...
See Seed Data for more information regarding seedData.
This provides you with two easy to use folders, one for grunt tasks and the other for gulp tasks.
See Grunt Tasks and Gulp Tasks for more information.
This is the main entry point of a normal CleverStack "Clustered" Application, in most cases you will not need to modify this file.
bin/cluster.js HookBy placing a file in any modules /modules/:moduleName/bin/ folder called cluster.js you are able to "hook into" when your cluster starts, it will be loaded and run before the cluster.js file is executed, (Example: If the background-tasks module is installed and enabled, this type of hook will setup the background task process.)
Example See the Clever Background Tasks cluster.js hook for an example of how you can use this feature.
Each module's Gruntfile.js config is deep merged into this files main grunt config before registering any tasks with grunt, which gives you the power to both add grunt tasks and modify the gruntConfig inside each module.
This files main use is the entry point of each HTTP Web Serving child process within the "Clustered" environment that app.js provides.
You can use this script to spawn a single processed Application, useful for debugging with node-inspector so it will attach to the process by using --debug-brk.
Important To run this file on its own you will need to manually set your NODE_PATH.
This file defines the Application and it's information, scripts and NPM dependencies just like every other NPM Module.
To make configuration as easy and comprehensive as possible, you are not only able to define a global.json configuration file, you can also define configuration files for each environment regardless of what you call them.
If you’re willing to restrict the flexibility of your approach, you can almost always do something better.
Each of the following files are loaded and then deep merged into one application config object, in the exact order listed here.
This file is required and must exist, as this is the place for any default (or GLOBAL) configuration. Don't Delete!
See Module Configuration Documentation for more information
See Module Configuration Documentation for more information
The default environment names are, LOCAL, DEV, STAG and PROD.
To take advantage of an environment based configuration file, you need to set an Environment Variable called NODE_ENV to the name you called your environment. (We use NODE_ENV=LOCAL for local development).
Consider the following code, which uses a "Magic Module" to load the json configuration files and deeep merge them
config = require('config');This section of the documentation is either out-dated or incomplete, please ask for help in github or gitter if you need more information.
Simply by placing a javascript file in the backend/tasks/grunt folder and exporting an Object Literal containing the config and register keys, unless the task does not need to register, in that case you can just export the config on the root level of the object.
 1 // Config with register
 2 module.exports = {
 3   config: {
 4     dist: {
 5       // ...
 6     }
 7   },
 8   register: function(grunt) {
 9     // grunt.registerTask('build', ['build:dist']);
10   }
11 };
12
13 // Config on the root level
14 module.exports = {
15   dist: {
16     // ...
17   }
18 }The name of the file will be used as the key inside the gruntConfig, as an example, for the grunt task concurrent.js, the gruntConfig would be gruntConfig[concurrent]
Our Command Line Interface (CLI) was designed to be as modular as possible, so that applications could take advantage of modules that are created and published to our Open Source EcoSystem by anyone, as well as our Official Modules.
See the CLI Documentation for more information on our Command Line Interface.
By using the CleverStack CLI's clever init command, creating new projects is easy and straight forward.
# for frontend & backend
clever init my-app

# backend only
clever init my-app backend
Note After running this command you may be prompted to configure the module/s your installing, see Configuration for more information. Additionally you may be prompted to setup the seed data for the module/s your installing, see Seed Data for more information.
If you are using SQL/ORM (aka MySQL, Postgre etc) then you will need to manually run the CREATE DATABASE command to create your database, the underlying library we use does not support this functionality.
This command may take awhile depending on your internet connection and computer specifications.
If you see a command failed error in your terminal/console after installing a module and seeing a message that states it's about to rebase or seed your database, it is highly likely that something is wrong with your configuration that you need to fix.
See Configuration and Seed Data for information.
This section of the documentation is either incomplete, please ask for help in github or gitter if you need more information.
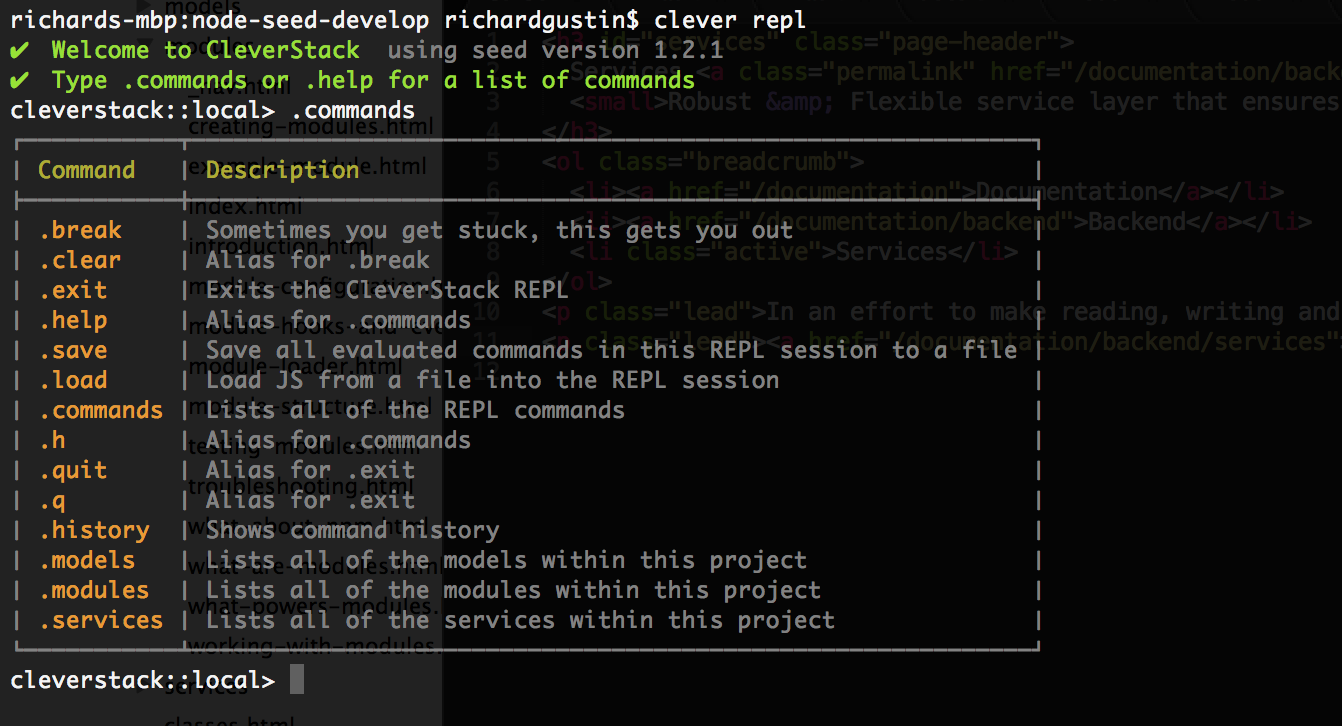
To use the CleverStack REPL, simply run
$ clever repl
For more information please see the CleverStack CLI REPL Documentation.
This section of the documentation is either incomplete, please ask for help in github or gitter if you need more information.
clever test unitOr simply use the alias
clever testclever test e2eOr simply use the alias
clever testDebugging a CleverStack Application is made easy by using the debug NPM Module, and by setting the DEBUG environment variable with the names of the debuggers you want enabled.
All debuggers in CleverStack have the cleverstack: suffix, to enable logging for all CleverStack features & modules simply set your DEBUG environment to cleverstack:*.

To enable all CleverStack debuggers, simply run export DEBUG=cleverstack:* on your Terminal if you're running Mac or Linux, or if you're on Windows simply run set DEBUG=cleverstack* in your command line. (CMD).
In an effort to make reading, writing and maintaining the documentation as easy as possible, we have put the documentation for Classes on it's own page.
In an effort to make reading, writing and maintaining the documentation as easy as possible, we have put the documentation for Modules on it's own page.
In an effort to make reading, writing and maintaining the documentation as easy as possible, we have put the documentation for Controllers on it's own page.
In an effort to make reading, writing and maintaining the documentation as easy as possible, we have put the documentation for Services on it's own page.
In an effort to make reading, writing and maintaining the documentation as easy as possible, we have put the documentation for Models on it's own page.
We will document any "gotchas" here along with any important open GitHub issues. Please open an issue if you see a bug.
Firstly please read our guidelines for contributing, Then fork the CleverStack Node Seed github repo, once you are ready please submit a "Pull Request" for review.